本次作业要求我们实现 Z-buffer 、栅格化和 SSAA(也就是超采样)。我们先看看前两个东西,再看看 SSAA。
Z-buffer和栅格化
代码框架
我们要补全的 rasterize_triangle 函数在 draw 函数内被调用,可以看到 draw 函数已经做好了三角形的投影变换,我们只要把 $[0, \text{width}] \times [0,\text{height}] \times [n,f]$ 里的三角形渲染到屏幕上就好。输入的三角形大概形如这样:
-------input triangle---------
529.259
    350
49.3857
      1
--
    350
529.259
49.3857
      1
--
170.741
    350
49.3857
      1
--
-----------------------------
insideTriangle 函数
用课上讲的叉乘法判断点是否在三角形内。“在三角形内”这个说法也不是特别严谨,更准确地说应该是判断三角形在屏幕上的二维投影是否包含这个点。
/*
    Return whether (x, y) is in the triangle, ignoring its z value.
*/
static bool insideTriangle(float x, float y, const std::array<Vector4f, 3>& triangle)
{
    Vector2f point1 = {triangle[0].x(), triangle[0].y()};
    Vector2f point2 = {triangle[1].x(), triangle[1].y()};
    Vector2f point3 = {triangle[2].x(), triangle[2].y()};
    Vector2f checked_point = {x, y};

    auto cross_product = [](const Vector2f& v1, const Vector2f& v2) {
        return v1.x() * v2.y() - v1.y() * v2.x();
    };

    float side1 = cross_product(point1 - checked_point, point1 - point2);
    float side2 = cross_product(point2 - checked_point, point2 - point3);
    float side3 = cross_product(point3 - checked_point, point3 - point1);

    return (side1 > 0 && side2 > 0 && side3 > 0) || (side1 < 0 && side2 < 0 && side3 < 0);
}
rasterize_triangle 函数
这个实现好像没什么特别值得说的地方,简简单单采采样,然后用 depth_buf 实现 z-buffer 就好。
//Screen space rasterization
void rst::rasterizer::rasterize_triangle(const Triangle& t) {
    auto v = t.toVector4();

    // Find bounding box
    float left = v[0].x();
    float right = v[0].x();
    float bottom = v[0].y();
    float top = v[0].y();
    for (auto& vec: v) {
        left = std::min(left, vec.x());
        right = std::max(right, vec.x());
        bottom = std::min(bottom, vec.y());
        top = std::max(top, vec.y());
    }

    // Update pixels in bounding box
    for (int x = static_cast<int>(left); x <= static_cast<int>(right) + 1; x++) {
        for (int y = static_cast<int>(bottom); y <= static_cast<int>(top) + 1; y++) {
            if (!insideTriangle(x+0.5, y+0.5, v)) {
                continue;
            }

            // Interpolate z value
            auto[alpha, beta, gamma] = computeBarycentric2D(x+0.5, y+0.5, t.v);
            float w_reciprocal = 1.0/(alpha / v[0].w() + beta / v[1].w() + gamma / v[2].w());
            float z_interpolated = alpha * v[0].z() / v[0].w() + beta * v[1].z() / v[1].w() + gamma * v[2].z() / v[2].w();
            z_interpolated *= w_reciprocal;

            // A lower z-value means it is displayed in front
            if (z_interpolated < depth_buf[y * width + x]) {
                depth_buf[y * width + x] = z_interpolated;
                set_pixel(Vector3f(x, y, z_interpolated), t.getColor());
            }
        }
    }
}
SSAA的实现
SSAA 的实现相较而言更困难一些,由于杂七杂八要改的地方比较多,我就先说下大致思路,再聊聊咱踩的两个坑。
不过在此之前,先来看看我们的成果吧!(这是动图
大致思路
我们要先把所有内容渲染到大小为 $(\text{width} * 2, \text{height} * 2
)$ 的自定义 buffer 里,再根据自定义 buffer 的内容填充屏幕上的像素。
要注意的是,我们不能直接在 rasterize_triangle 里把三角形画到屏幕上(具体原因见“踩坑1”那一节),而是要在 rasterize_triangle 中把三角形画到自定义的 buffer 里,再新增一个 resolve 函数并把它放到 draw 的最后,从而把自定义 buffer 里的内容画到屏幕上:
void rst::rasterizer::resolve() {
    for (int y = 0; y < height; y++) {
        for (int x = 0; x < width; x++) {
            frame_buf[y * width + x] = Vector3f::Zero();
            for (int i = 0; i < 4; i++) {
                frame_buf[y * width + x] += ssaa_frame_buf[(y * width + x) * 4 + i];
            }
            frame_buf[y * width + x] /= 4.0;
        }
    }
}
更细节一些的话,我们需要做这些工作:
- 在 rasterizer.hpp 里加入 ssaa_frame_buf 和 resolve 的定义。
- 修改 rasterizer 的初始化函数和 clear 函数,正确初始化和重置 ssaa_frame_buf。
- 修改 set_pixel 函数,让它把内容画到 ssaa_frame_buf 里,而非 frame_buf 里。
- 修改 rasterize_triangle,让它用使用更高的采样率。
- 实现 resolve 函数。
杂七杂八要改的地方比较多,这里就不放更多代码了。
踩坑1
SSAA、filtering 都建立在“我们对理想图像进行滤波”的基础上。也就是说,要先把世界里的对象按正确的前后顺序变为一个二维图像,然后再滤波。所以直接在 rasterize_triangle 里把像素划分成子像素然后取平均并不能实现 SSAA,而是会在三角形重叠的地方显示出黑边。
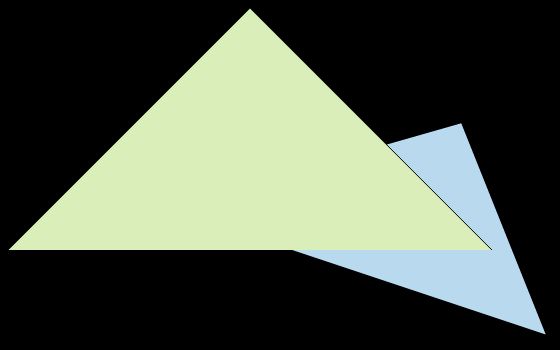
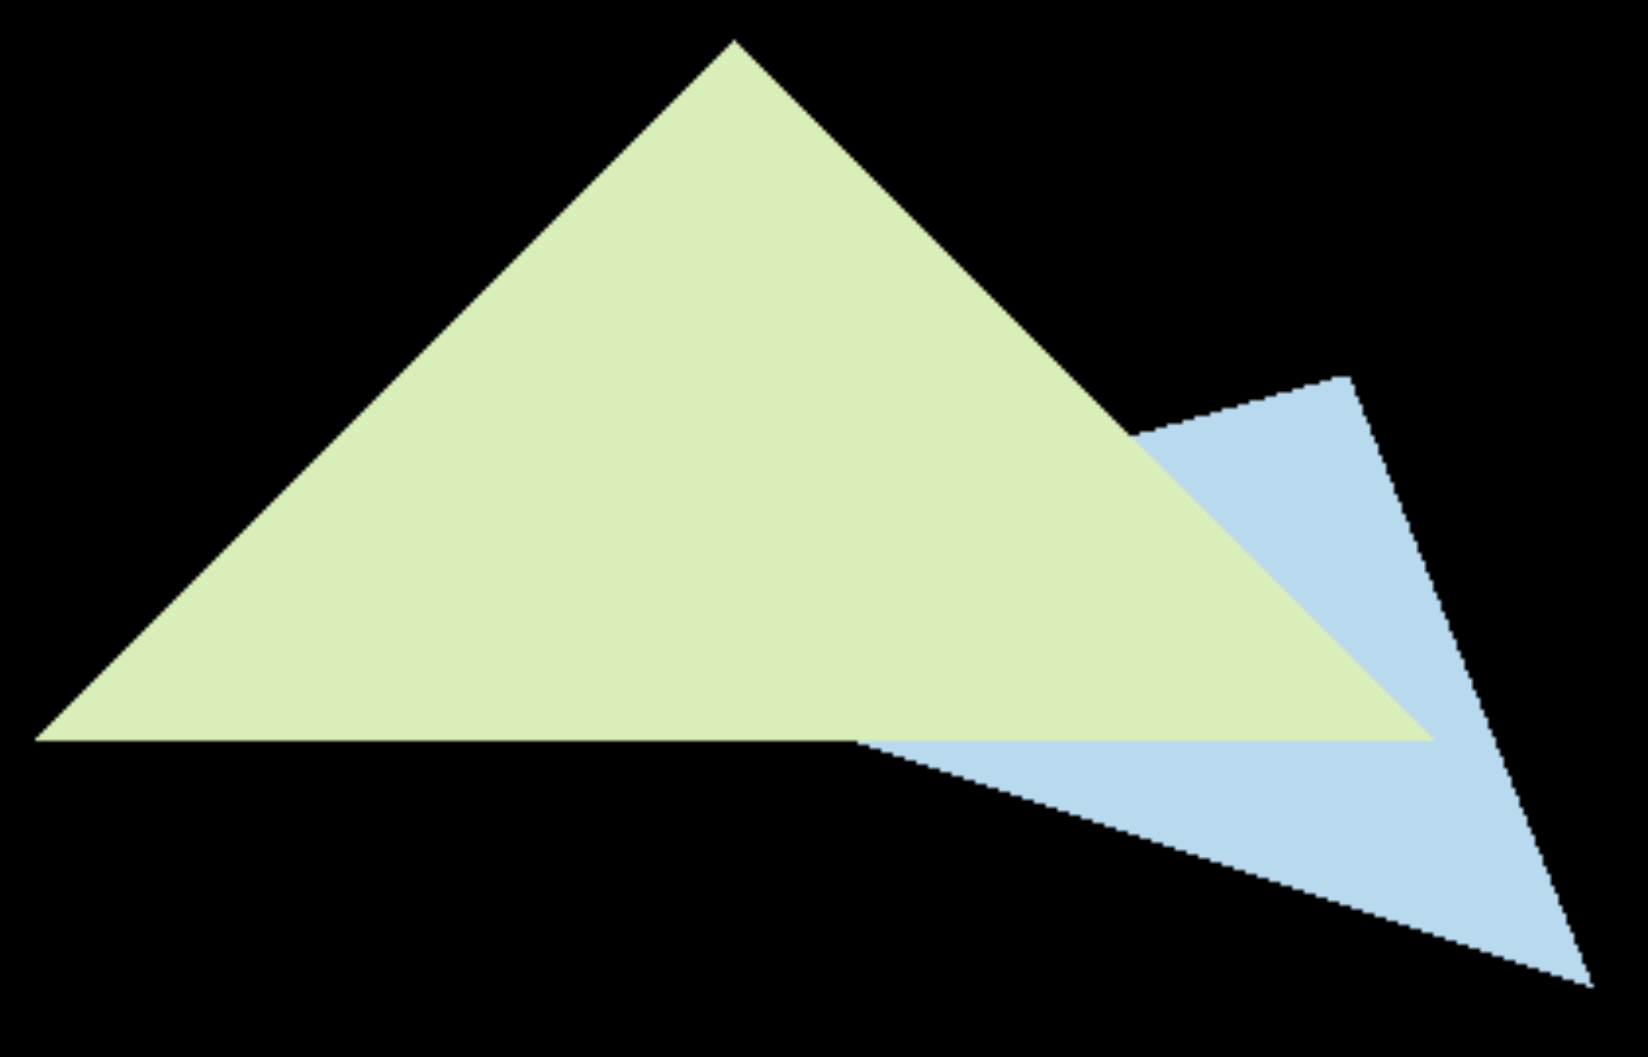
让我们来看一个具体例子。考虑一个 1/4 被绿色三角形占据、3/4 被蓝色三角形占据的像素,SSAA 会把 1/4 绿 + 3/4 蓝 作为这个像素的颜色。
而如果直接在 rasterize_triangle 里把像素划分成子像素然后取平均,那么栅格化蓝色三角形时,这个像素被当成 3/4 蓝;栅格化绿色三角形时,这个像素被当成 1/4 绿。无论谁在前面,最终结果要么是 3/4 蓝,要么是 1/4 绿,总与 SSAA 的结果 1/4 绿 + 3/4 蓝 不同。
踩坑2
insideTriangle 的参数 x 和 y 的类型原本是 int,而在 SSAA 里我们把像素划分成了四个子像素,这些子像素的坐标大多不是整数。因此我们要把 insideTriangle 的 x 和 y 的类型改成 float.
static bool insideTriangle(int x, int y, const Vector3f* _v)
{
    // TODO : Implement this function to check if the point (x, y) is inside the triangle represented by _v[0], _v[1], _v[2]
}